Wednesday, April 30, 2008

Sweet Tweed

After all of our Spring Cleaning efforts here this year (it was massive, trust me) most of our dishcloths have migrated into the dishrag category. Some of them were quite new just a few weeks ago, but you'd never know it after they were used to clean out the fridge in the garage.

I was thinking to myself that it would be great if someone made dishcloths thicker and more sturdy. Then I decided to break out the 100% cotton yarn and be that someone. So the search for an interesting, textured-but-not-too-textured pattern ensued.
Then I found the tweed stitch texture. It seems perfectly suited to this application! The tweed stitch makes a very interesting and surprisingly flat and solid knit. It involves a multiple of 2 sts+1 and is worked as follows:
  • First Row (RS): K1 *yf, sl1p, yb, K1, repeat from * to end.
  • Second Row: P2 *yb, sl1p, yf, P1, repeat from * to last stitch, P1.
  • Repeat these two rows for as long as you like.
It makes a lovely woven pattern on one side (I think this is the right side, but the pattern I gleaned this texture from thought otherwise, we will agree to disagree.)
And the reverse has this lovely knobbly texture that I think will be great for scrubbing.

Wednesday, April 23, 2008

Update!

Since I was unsure about current airline policies on knitting needles I've decided to leave all of my crafty items at home while I traverse the country this week. Instead, I've picked up a few good books to occupy the time. New posts will be coming soon though!

http://www.tsa.gov/travelers/airtravel/prohibited/permitted-prohibited-items.shtm

Hmm. It turns out that knitting and crochet needles are allowed on airplanes. Darn.

Sunday, April 20, 2008

I think I bought out the store.

I went back to my local JoAnn's today and bought all of their Linen color Lion Brand Yarn. It's from the Vanna White collection, which made me say "huh. What does she have to do with yarn?" According to the label she has been their spokeswoman for 13 years now, authoring books and making appearances. If it's good enough for Vanna, then it's good enough for me!

This is to make a throw blanket for the couch in my mom's living room and it is a precise match for the wall color (which is a Benjamin Moore color called Sea Pearl). This makes the second time in a month that my family has actually requested that I knit something for them! Now I can be sure that my skills have improved immeasurably since I first began. Back then things were graciously accepted in the same manner as children's artwork; "That's beautiful honey ... what is it?"

Saturday, April 19, 2008

It Knits Itself?!?

I love the clever use of stop-motion animation here! Although I enjoy knitting by hand, I wouldn't mind if some of my projects magically finished themselves :-)

Thursday, April 17, 2008

Fair Isle (in the round no less!)

I like to take on new projects that challenge my knitting abilities, but this one was probably one of my most ambitious. It took me a few weeks of on-and-off knitting, but the satisfaction upon completion was well worth it!
This Gryffindor-inspired fair isle bag (that I've made into a pillow instead) came from the freebie pattern site I mentioned before: http://www.freshislefibers.com/Patterns/hpknittinglinks.htm
but was created by Rosemary Waits, of Quietish blog fame.

It's knitted in a plain ol' worsted weight Caron yarn on a 29" set of circular needles. I'm not precisely sure what size they are because I didn't buy them, they just sort of got passed down to me (though nobody in the fam. knits ...) They worked out just fine as far as the gauge went, so I'm not going to worry about it.

I pirated the pillow insert from one of my bed pillows though, just for testing/sizing/picture purposes, so it will have to be put back. Once I get another insert (16" please!) I'll sew up the ends and finish the pillow.

Here's a Site Worth Checking Out


Here's a great freebie site with all sorts of HP knitting projects. I've made a few of the items on here and will probably make quite a few more. Check it out!


http://www.freshislefibers.com/Patterns/hpknittinglinks.htm

Wednesday, April 16, 2008

Finger Knitting

This sure looks like a no-fuss way to "knit". No needles, no counting, no patterns to follow. I'm sure this is a camp craft I missed out on as a kid. My only question is what these can be used for? After the obligatory bracelet/scarf combo the options seem a little limited, mostly by the fact that we only have 4 fingers and a thumb.

Monday, April 14, 2008

SALE!

My local JoAnn's is having a great big sale because they're remodeling, so I picked up a couple of Caron GIANT one pound yarn balls and some new, smaller double pointed needles (#4 or 3.5 mm).

It's a lovely dusty navy color called Cape Cod Blue 539. They had so much yarn on sale that I got a little overloaded and ended up just getting this. I'm regrouping and going back this weekend with a plan and some patterns in mind. Otherwise I just wander around looking at yarn for 2 hours. Quite unproductive.

I wonder what this yarn will become? I didn't have any particular pattern or project in mind when I picked it up, I just liked the color. It's a very basic worsted weight acrylic so the possibilities are nearly endless. [Side note: I love the look of Wool yarn but it makes me abnormally itchy :-( and sometimes leads to hives.]
New needles are a good thing, but at 40% off they're a steal! Perhaps I'll try to make socks again ... My first attempt was somewhat unsatisfying, so I gave it up (perhaps too soon).

I also priced those fancy-pants knit markers I've been going on about, and at $3.50 a bag I'll stick to the free paper-clips on principle. At least paper-clips are multi-taskers!

AND I forgot to get the bobble eyes for my little owl critter. Sigh. See what yarn sales do to me? I got all distracted!

Saturday, April 12, 2008

"He's a sweet little owl, isn't he."


I just knew that I could turn the pom pom technique into something! I've created a pom pet pattern, dubbed the Pigwidgeon Pattern for it's obvious resemblance to a certain tiny grey owl, to follow:

The Pigwidgeon Pattern
One 4-finger-pom
One 2-finger-pom
Two knitted wings
  • Using 4.0 mm needles and the long tail cast-on method, cast on 5 sts and leave a long tail for assembly purposes!
  • Purl 1 row
  • Knit 1 row
  • Increase between the 1st and 2nd sts and 4th and 5th sts, using your favorite increase method. (I chose to pull the stitch up from below.) [7 sts]
  • Knit 1 row
  • Purl 1 row
  • Knit 1 row
  • Purl 1 row
  • K2tog, K3, K2tog [5 sts]
  • Purl 1 row
  • Knit 1 row
  • Purl 1 row
  • K2tog, K1, K2tog [3 sts]
  • Purl 1 row
  • Cast off and weave in the end.
For a detailed pom pom production instructional video, see this post.
Begin 4-finger-pom by wrapping your chosen yarn around 4 fingers. Don't do this too tightly or you won't be able to extricate your fingers when you're done!
I wrapped the yarn around 75 times in order to get a very fluffy pom.
Cut the end of the yarn and then cut yourself a piece (sufficient in length) to tie around your yarn bundle. I like to use a self-cinching or surgeon's knot (which just means making your regular shoe tying over-under and then going over-under again). Tie it tightly because this is what holds your yarn critter together.
Snip the yarn through the loops where your fingers were. You have removed your fingers by now right? Good.
Time to fluff up your pom pom and give it a little trim so that it is round and even all the way around. Don't get overzealous with the hair cut though!
Make another pom pom via the same method using just 2 fingers this time. There, you've got the body the head and the wings!

Assembly

Using a yarn needle and some of the same yarn from the critter construction, sew on the head pom (smaller) by going up through the body pom (larger), back down through the head pom, and back through the body pom. You can do this as many times as you think are necessary to make it sturdy, but I've just made 2 passes and tied it off. [Make sure that you're going through the centers of the poms, otherwise the yarn will just pull through the sides!]

Threading the long tail from one of the wings onto the yarn needle, pass the needle through the body pom (at the desired wing possition) and use that end to secure the opposite wing. Do this by sewing through the 5 sts on the opposite wing and then back through the body pom and knot the yarn so it won't slip back through. Trim it to blend in with the body pom. Thread the tail from the opposite wing on the yarn needle and use it to sew on the first wing in the same fashion. Make sure that you pull the wings in close enough to the body, you don't want them to be too floppy!

Now you just have to find something for the eyes and beak. Little googley eyes from the craft store are easy to work with and you just have to hot glue them in place. Some felt glued on for the beak works quite nicely (just 2 little triangles, trimmed to fit).

Thursday, April 10, 2008

One way to make a Pom Pom www.bricoreandfamily.blogspot.com

This is neat and oh so simple! I bet there are all kinds of things you could make these puff-ball pom poms into, you know, other than embarrassing hats ...

I'll give some things a try and get back to you!

Tuesday, April 8, 2008

Hats, Hats, Hats!

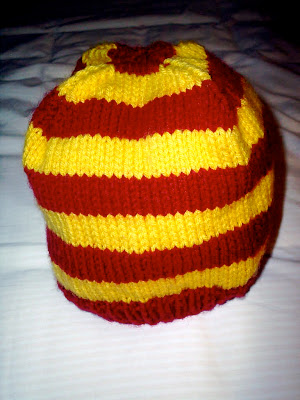
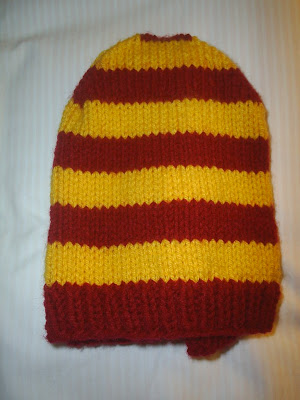
Here's the House Hat I said was already finished (minus the washing and blocking). Spring has definitely sprung where I'm from though, so it doesn't much matter until hat season rolls around again. We're probably just a few weeks from having the "Is it too soon to turn on the air conditioning?" debate. [And with utility costs being what they are, the answer is always yes, but we usually lose our resolve around the beginning of June.]
I am a big fan of the decreases at the top of the hat, it looks much cooler this way. There's a time and a place for pom-poms and I just don't think that it would be right for this hat. And they were easy to work in, even without those fancy markers. [Note to Self: Why don't I have those yet?]

My brother's hat is coming along quickly too, though I don't think he'll have any opportunity to wear it until next winter.

Monday, April 7, 2008

My Brother Wants a Hat?

I made myself a neat Cardinal and Gold striped hat from the wonderful Charmed Knits book of knitting projects [Designed/Created by Alison Hansel and found through The Blue Blog]. I'll have to post a picture of it after it gets washed and blocked ...

Anyway, my brother asked me if I would make him one too (the narrow striped variety). He has never ever asked me to knit him anything before! Perhaps that means my skills are improving? At any rate, I've cast on and created the ribbed edging already. He is well on his way to having a hat!

[Side Story: I have knitted things for my brother before, but he hasn't shown much interest. As a matter of fact, I think he has deliberately tried to load them off on younger cousins. The nerve. But, I'm happy to make him something he wants!]

Saturday, April 5, 2008

Spring Cleaning!

During my spring cleaning of the garage I came across a mysterious "MISC." box that contained all sorts of junk from my old apartment, my old dorm, and my sorority house days. Most interestingly, I found about 4 yards of fabric that I had long since forgotten about:The lovely, sparkly cloud print was once tacked up under a bunk bed so I wouldn't have to stare up at a sheet of plywood all semester.
And the picnic print ... well, I have no idea what that was for originally.

Now the question is what to do with them! I feel obliged to actually use them now that I have rescued them from the garage. I've never quilted anything, so that could be fun, but they don't really go together (different blues). [Side Note: Since I've never quilted anything, I obviously don't have a fabric stash to pull supplementary fabrics from yet.] Two yards of each; you'd think I'd be able to come up with something! The problem is, I don't have blue anywhere in the house. Hmm.

Thursday, April 3, 2008

A Red (and Gold) Letter Day

Having recently acquired a couple of new yarn needles I was able to add the duplicate stitch to my Mini Weasley Sweater! Also, here is a picture of the pipe cleaner hanger I fashioned. I took it out of the sweater for Letter stitching purposes, so I figured that a picture would be nice.

Wednesday, April 2, 2008

Teddy Bear Toy

"Teddy isn't difficult to knit, but he is constructed as a toy so it's important that you follow the finishing instructions carefully to give him neat seams and well-filled proportions."

Measurements: Finished teddy is approximately 18" tall

You will need: Two skeins of 3.5 oz Sirdar Cossack Chunky (shade 084)
I used a skein of Simply Soft in Hunter Green and another partial skein in Heather Grey instead.

Pair of size 10.5 (6.5 mm) knitting needles
washable polyester toy stuffing
2 Buttons for eyes (I liked the snap-on eyes better)
Wool embroidery yarn in black
28" strong cotton tape

Gauge: 12.5 sts and 18 rows to 4" over St st on size 10.5 (6.5mm) needles, or the size required to give the correct gauge.
I used my size 5 knitting needles and never looked back. I'm not opposed to calculating the gauge, but it didn't seem to matter. And besides, I wanted a bit smaller bear anyway.

Abbreviations: ssp = Slip the first st, then the 2nd st knitwise, return the sts to left needle, take right needle behind to insert it into 2nd, then first st and p2tog.

Head: Left Side- cast on 12 sts. Beg with a k row, work 4 rows St st.
  • 5th row: (RS) Inc in first st, k to end. 13 sts. Purl 1 row.
  • 7th row: Inc in first st, k to last 2 sts, inc in next st, k1. 15 sts.
  • 8th row: Inc in first st, p to end. 16 sts.
  • 9th and 10th rows: As 7th and 8th rows. 19 sts.
  • 11th row: K to last 2 sts, inc in next st, k1. 20sts.
  • 12th row: As 8th row. 21 sts.
  • 13th row: As 11th row. 22 sts. Purl 1 row.
  • 15th row: As 11th row. Work 9 rows in St st.**
  • 25th row: (RS) K1, k2tog, k to end. 22 sts.
  • 26th row: Bind off 8 sts, p to end. 14 sts.
  • 27th row: As 25th row. 13 sts. Purl 1 row.
  • 29th row: K1, k2tog, k to last 3 sts, sl1-k1-psso, k1. 11 sts. Purl 1 row.
  • 31st row: As 29th row. 9 sts. Purl 1 row. Bind off.
Right Side: Reverse shapings, work to match left side to **.
  • 25th row: (RS) Bind off 8 sts, k to last 3 sts, sl1-k1-psso, k1. 14 sts. Purl 1 row.
  • 27th row: K to last 3 sts, sl1-k1-psso, k1. 13 sts. Complete as left side.
Gusset: Cast on 2 sts.
  • 1st row: (RS) (Inc in next st) twice. 4 sts. Purl 1 row.
  • 3rd row: (Inc in next st, k1) twice. 6 sts. Work 9 rows in St st.
  • Inc row: (RS) Inc in first st, k to last 2 sts, inc in next st, k1. 8 sts.
Inc in this way at each end of the next 3 RS rows. 14 sts. Work 25 rows in St st.
  • Dec row: K1, k2tog, k to last 3 sts, sl1-k1-psso, k1. 12 sts.
Dec in this way at each end of 2 foll 4th rows and next 2 RS rows. 4 sts. Work 3 rows in St st. Bind off.

Ears (Make 2): Cast on 18 sts. Beg with a k row, work 4 rows in St st.
  • Next row: (RS) K1, (K2tog), sl1-k1-psso) twice, k1. 6 sts.
Arrange 3 sts on each needle and graft sts together.

Body: Left Half: Cast on 13 sts.
  • 1st row: Inc in first st, k to last 2 sts, inc in next st, k1.
  • 2nd row: Inc in first st, p to last 2 sts, inc in next st, p1.
    • Inc in this way at each end of next 3 rows. 23 sts. Purl 1 row. Inc as before at the end of next 3 RS rows. 26 sts.
  • Work 13 rows in St st.
  • Dec row: (RS) K1, k2tog, k to last 3 sts, sl1-k1-psso, k1. 24 sts.
    • Dec in this way at each end of 2 foll 4th rows and next 2 RS rows. 16 sts.
    • Now dec 1 st at the end of the next 3 RS rows. 13 sts. Purl 1 row. Bind off.
Right Half: Reversing all shapings, work to match left half.

Legs: Left Outer Leg: Cast on 16 sts. Beg with a k row, work 6 rows in St st.
  • 7th row: (RS) K to last 3 sts, sl1-k1-psso, k1.
  • 8th row: P1, ssp, p to end.
  • 9th, 10th, and 11th rows: As 7th, 8th, and 7th rows. 11 sts. Purl 1 row.
  • 13th row: (RS) K1, k2tog, k to last 2 sts, inc in next st, k1
    • Work last 2 rows 3 more times. Purl 1 row.
  • Inc row: (RS) Inc in first st, k to last 2 sts, inc in next st, k1. 13 sts.
    • Inc in this way at each end of 2 foll RS rows. 17 sts.
    • Work 9 rows in St st.
  • Dec row: (RS) K1, k2tog, k to last 3 sts, sl1-k1-psso, k1.
    • Dec in this way at each end of next 3 RS rows.
  • Last row: (WS) P1, ssp, p to last 3 sts, p2tog, p1. 7 sts. Bind off.
Right Inner Leg: Work as given for left outer leg.
Left Inner Leg: Reversing all shapings, work to match left outer leg.
Right Outer Leg: As left inner leg.

Soles: Make 2:
[If you're using contrasting colors, this should be your alternate color] Cast on 5 sts. Work in st st, inc 1 st as before at each end of first and 2nd rows. 9 sts. Work 9 rows in St st. Dec one st as before at each end of next 2 rows. 5 sts. Bind off.

Arms: Left Outer Arm: Cast on 3 sts. Work in St st. (Inc 1 st at each end of next row and 1 st at beg of foll row) twice. 9 sts. Inc 1 st at beg of next and foll RS row. 11 sts. Purl 1 row.
[If you're using contrasting colors, this should be your main color]
  • Next row: (RS) Inc in first st, k to last 3 sts, sl1-k1-psso, k1.
    • Work last 2 rows 3 times more. Work 3 rows in St st. Purl 1 row.
  • Next row: (RS) K1, k2tog, k to last 2 sts, inc in next st, k1.
    • Work last 2 rows twice more. Work 5 rows in St st.
    • Dec as before at each end of next 4 rows. 5 sts. Bind off.
Right Inner Arm: Work as given for left outer arm. [If you're using contrasting colors, this should be your alternate color]
Left Inner Arm: Reversing all shapings, work to match left outer arm.
[If you're using contrasting colors, this should be your alternate color]
Right Outer Arm: As left inner arm.
[If you're using contrasting colors, this should be your main color]

To Finish:

Leaving a gap at bound-off edges, join sides of body and inner and outer arms and legs. Set in soles. Stuff arms and legs firmly and close gaps. Stuff lower half of body. Thread a large darning needle with a 16" length of tape. Pin one end of tape to top back seam. Bring needle out of body at left leg position, take through stitches and top of left inner leg, thread tape through body and out at right leg position, take through stitches at top of right inner leg and back into body. Undo pin, pull tape to close legs to body, and knot tape firmly. Stuff top of body and, using remaining tape, join arms in the same way. Complete body stuffing, gather bound-off edges, pull tight and secure.

Join left and right sides of head at chin, insert cast-on point of gusset at nose and sew sides of head to gusset. Stuff head firmly, filling out nose and neck well. Gather neck edge, pull tight and secure. Sew head onto body, tilting the work at an angle for ease. Using thread, embroider nose and mouth. Use black thread to sew through holes in one button, leaving long ends. Thread a sharp darning needle with one end, place button in left eye position and sew on, taking each end diagonally through head and out slightly apart at right ear position. Pull ends to pull button into head, knot and darn in. Sew on right eye button as before. Sew on ears.

Salazar the Bear

See, I told you that I had Slytherin leanings. And no, I don't think it makes me a bad person. It also doesn't make me one of the emo/hot topic crowd either. Anyways, meet Salazar:

He's a knit bear in Hunter Green and Heather Grey Simply Soft yarn. He's 15" standing up, has two snap-on button eyes, and loves long walks on the beach. His ears hadn't been sewn on until just now because I had to get a new yarn needle (the old one broke while I was doing his nose details, darn bear). He languished in the BIN OF UNFINISHED KNITS for months before he finally got ears and paw details and even a mouth!
He looks pretty happy to be out of the bin, don't you think?

Sal's pattern was quite a project, though it is ranked as Beginner in the book that it came from [Readers Digest The Complete Knitting Set]. It's a bit finicky for me, so he probably won't have any bear buddies any time soon. Want to make one for yourself? Here's the pattern I used!

You can use any colors you want to though. Make yourself a Godric, Helga, or Rowena out of contrasting house colors. Or I suppose you could make a regular bear too, but I think this was more fun!

Tuesday, April 1, 2008

Scratch That.

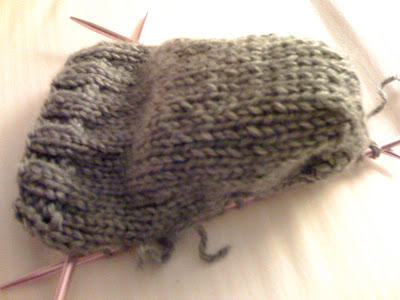
Although it has been a great learning experience so far, I've decided that I don't like this sock enough to finish it, let alone make it a mate. [Side Note: socks without mates eventually make their way to the rag bin, and there's no future in that. It's better this way.] Chalk this one up to trial and error I guess.

Here we see the elusive "Aha!" moment in its natural habitat...


So that's a heel flap! It's the joining of those separated sections back together with the cunning use of K2tog and P2tog.
Here's the heel all put together, and looking like an athletic supporter. Ew.